Creately Template Roundup: August Week 2

Did you check our last week’s template round up post yet? Here are five new templates to help you with team building, UX design, and risk analysis. Use these templates, to streamline communication, foster creativity, and make better decisions within your projects.

This week, we are focusing on HR professionals and team members who wants to run effective meetings. These templates will facilitate the seamless execution of meetings, promoting efficient communication and collaboration among HR professionals and team members.

Discover a wide range of industry-specific templates and examples in our diagram community to help you manage your daily tasks efficiently.

This week’s templates include:

Peer-to-Peer 1:1 Worksheet

The Peer-to-Peer 1:1 Worksheet is designed for professionals seeking enhanced communication, strengthened relationships, and valuable feedback exchange across different departments. This template provides a structured platform to foster meaningful conversations and facilitate collaboration, making it ideal for building rapport and driving collective growth.

How to use the peer to peer 1:1 worksheet:

  1. Schedule the Meeting: Choose a convenient time to meet with your colleague from another department.
  2. Access the Template: Open the Creately app and locate the “Peer-to-Peer 1:1 Worksheet” template.
  3. Set the Agenda: Collaboratively outline the topics to be discussed. Note down the objectives in the dedicated section of the template.
  4. Structured Conversation: Utilize the template’s sections to explore each agenda item. Write notes, sketch diagrams, and share thoughts collaboratively.
  5. Action Points and Feedback: Summarize key takeaways from the conversation. Define actionable steps and assign responsibilities. Share constructive feedback to nurture growth.

Click on the image to edit the peer-to-peer 1:1 worksheet

1-on-1 Meeting Template

The 1-on-1 Meeting Template helps managers to establish meaningful connections with their direct reports. This template assists in conducting stuctured discussions, allowing managers to exchange feedback, cultivate trust, and collaboratively plan for individual and team development.

How to use the 1-on-1 meeting template:

  1. Schedule the Meeting: Set up a regular slot for the 1-on-1 meeting with your team member.
  2. Access the Template: Open the 1 on 1 meeting template on Creately which is tailored for 1-on-1 discussions.
  3. Agenda Setting: Collaboratively define the meeting’s agenda. Allow your direct report to contribute topics they want to discuss, ensuring a well-rounded conversation.
  4. Discussion and Feedback: Use the template’s sections to navigate through agenda items. Listen actively, provide feedback, and address any concerns or questions.
  5. Action Planning: Summarize key takeaways from the meeting. Together, identify actionable steps, set goals, and outline a plan for growth and development.

Utilize the 1-on-1 Meeting Template to have impactful interactions with your team members. This simple yet effective template facilitates feedback sharing, trust building, and growth discussions, ultimately contributing to enhanced team dynamics and individual progress.

Click on the image to edit the 1-on-1 meeting template

Effective Workshop Template

The Effective Workshop Template helps streamline the process of addressing business challenges efficiently. Workshops provide a dynamic approach to problem-solving by bringing together key stakeholders to collectively tackle issues in a live and interactive environment. This template simplifies the workshop process, ensuring that valuable input and feedback are harnessed effectively.

How to use the effective workshop template:

  1. Define Workshop Objective: Clearly outline the purpose and goal of the workshop. Identify the specific problem or issue you aim to address.
  2. Compile Stakeholders: Determine the key individuals who should participate based on their expertise and relevance to the problem at hand.
  3. Access the Template: Open the workshop template in Creately, designed to guide the collaborative session.
  4. Engage in Discussion: Utilize the template’s sections to facilitate focused discussions, idea generation, and sharing of insights among participants.
  5. Solution Mapping: Summarize the outcomes of the workshop. Distill the collective input into actionable steps, potential solutions, and areas for further exploration.

Click on the image to edit the effective workshop template

Career Progression Chart Template

The Career Progression Chart provides a visual representation of advancement within your company. This chart serves to clarify expectations, streamline promotion planning, and effectively communicate compensation ranges to potential candidates.

How to use the career progression chart:

  1. Access the Chart: Open the provided career progression chart template, tailored to your company’s roles and levels.
  2. Customize for Your Company: Adapt the chart to your organization’s roles, responsibilities, and skill progressions.
  3. Define Responsibilities: Clearly outline the responsibilities, skills, and competencies expected at each career level.
  4. Plan for Advancement: Discuss the chart with your team to set clear goals and create actionable plans for skill development.
  5. Recruitment Advantage: During candidate interviews, share the chart’s pay ranges and career paths to attract candidates aligned with your company’s growth vision.

Click on the image to edit the career progression chart example (marketing)

Career Growth Plan

The Career Growth Plan Template is designed to understand, nurture, and guide your employees’ professional journeys. This template helps discover an employee’s values, preferences, competencies, and limitations. Use this template to set targeted goals and action plans, ensuring employees achieve their desired career growth.

How to Use the Risk Assessment Template:

  1. Access the Template: Open the provided career growth plan template, designed to guide you through the process.
  2. Personalize the Plan: Customize the template by adding an employee’s details, such as their name and role.
  3. Identify Strengths and Values: Collaborate with the employee to discuss their values, preferences, and strengths.
  4. Set Development Goals: Work together to establish specific career goals. Outline the competencies and skills required to achieve these goals.
  5. Create Actionable Steps: Break down each goal into actionable steps and timeframes. This ensures a structured path to success.

Click on the image to edit the career growth plan

Creately Template Roundup: July Week 3
round-up-blog-feature-july-week-3

In our last week’s roundup post, we shared several templates specifically designed to help project managers streamline their project workflows.

This week, we are focusing on templates for UX designers, product managers, project managers, and HR professionals. These templates will help them with planning, mapping, managing, and executing various tasks.

Check out our diagram community for more industry-specific templates and examples to support your day-to-day tasks.

This week’s templates include:

UX Research Plan Template

The UX research plan template is typically used for user experience (UX) and user research. It helps structure and plan research activities effectively, ensuring a user-centered approach in product development. This template further helps with defining research objectives, identifying target users, selecting appropriate research methods, and creating a timeline for the research process.

Here’s how to use the UX research plan template:

  1. Objective setting: Clearly define the research goals and objectives. Identify what insights you seek to gain from the research and how it aligns with the product development process.
  2. Participant identification: Identify the target audience and user groups for the research. Determine specific user personas or characteristics that will be included in the study.
  3. Method selection: Choose proper research methodologies and techniques that align with the research objectives. Common methods include interviews, surveys, usability testing, and observation.
  4. Timeline and schedule: Create a timeline that outlines the research activities and milestones. Allocate sufficient time for data collection, analysis, and reporting.
  5. Resources and logistics: List the resources needed for the research, such as tools, equipment, and participant incentives. Make sure logistics, such as participant recruitment and research environment, are well-organized.

Click on the image to edit the UX Research Plan Template

Skip-Level 1:1 Template

The skip-level 1:1 template is used by managers, team leads, or executives when conducting skip-level meetings. In these meetings, the manager meets directly with employees who are not their direct reports but work in different hierarchical levels within the organization.

This template facilitates effective communication and creates a safe space for direct reports to share feedback and ideas to improve the organization. It allows managers to gain unfiltered insights into the team dynamics and identify areas for growth and development.

5 simple steps to use the skip-level 1:1 template:

  1. Plan the meeting: Prepare a meeting agenda with topics you want to discuss, like team performance or challenges.
  2. Be friendly and open: Create a welcoming atmosphere to make direct reports comfortable sharing their thoughts.
  3. Ask questions: Use open-ended questions to encourage detailed responses. For example, “How do you think we can improve?” or “What challenges do you face?”
  4. Listen actively: Pay attention to what they say, don’t interrupt, and show empathy for their concerns.
  5. Take action: Based on their feedback, create an action plan to address issues and make positive changes.

Click on the image to edit the Skip Level 1:1 Template

User Story Map

The user story map template is an essential tool for UX designers involved in Agile product development. It allows UX designers to collaborate with cross-functional teams in visualizing and prioritizing user stories in a structured manner.

This template organizes user stories based on user needs and goals, providing a comprehensive overview of the product’s features and functionalities. With itUX designers can ensure a user-centric approach to design, aligning with user requirements and improving the overall user experience.

5 simple steps to use the user story map template:

  • Identify user goals: Begin by understanding the goals of the target users. Identify what problems they want to solve and the outcomes they expect from the product.
  • List user stories: Create a list of user stories that address each user goal. Each user story should represent a specific functionality or feature that fulfills a user’s need.
  • Arrange user stories: Organize the user stories in a logical sequence based on user workflow. This helps create a flow that aligns with the user’s journey through the product.
  • Prioritize and slice: Prioritize the user stories based on importance and impact. Divide larger user stories into smaller, manageable “slices” to facilitate iterative development.
  • Build the roadmap: Use the user story map to build a product roadmap. This roadmap will help guide the development process, ensuring that the team delivers value to users at every step

Click on the image to edit the User Story Map

Stakeholder Management Template

The stakeholder management template is useful for project managers to effectively manage stakeholders throughout the project lifecycle. It helps with identifying and analyzing stakeholders involved in the project, understanding their interests, and building strong relationships.

By using this template, project managers can ensure open communication, address concerns, and secure stakeholders’ support, ultimately leading to project success.

Here’s how to use the stakeholder management template:

  1. Stakeholder identification: Begin by identifying all stakeholders involved in the project or initiative. List both internal and external stakeholders, including individuals, groups, or organizations impacted by or impacting the project.
  2. Stakeholder analysis: Analyze each stakeholder’s interests, needs, and expectations. Identify their level of influence and potential impact on the project. This analysis helps prioritize stakeholders and tailor communication strategies accordingly.
  3. Engagement plan: Develop a stakeholder engagement plan based on the analysis. Define the frequency and mode of communication with each stakeholder, outlining the key messages and desired outcomes.
  4. Mitigating concerns: Address any potential conflicts or concerns that may arise during the project. Plan strategies to manage stakeholders’ conflicting interests and ensure their support throughout the project lifecycle.
  5. Continuous monitoring: Regularly review and update the stakeholder management template throughout the project. Monitor stakeholder dynamics, adapt engagement strategies as needed, and proactively address any emerging issues.
  6. Capture action items: At the end of the meeting, document any action items or follow-up tasks that arise from the discussion. Assign responsibilities and deadlines to ensure progress after the meeting.

Click on the image to edit the Stakeholder Management Template

Project Canvas Template

The project canvas template is a powerful tool for project management and planning. This template provides a high-level overview of a project, capturing essential details and aligning team members on project goals. It is a concise and visual way to communicate project essentials, ensuring everyone is on the same page and working towards a common objective.

5 simple steps to use the project canvas template:

  1. Project purpose: Define the purpose and vision of the project. Clearly state the problem the project aims to solve or the opportunity it aims to capture.
  2. Key deliverables: Identify and list the primary deliverables the project will produce. These could be products, services, or outcomes that add value to stakeholders.
  3. Project scope: Define the boundaries of the project scope. Clarify what is included and what is not included in the project to prevent scope creep.
  4. Target users and stakeholders: Identify the target users or customers who will benefit from the project’s outcomes. Additionally, list the key stakeholders who will be impacted or have an interest in the project.
  5. Success criteria and risks: Set clear success criteria to measure the project’s performance. Define what success looks like and the metrics to evaluate progress. Also, identify potential risks that could impact the project and plan risk mitigation strategies.

Click on the image to edit the Project Canvas Template

Creately Template Roundup: June Week 4
feature-june-week-4

In our most recent roundup post, we shared a collection of helpful templates designed to streamline the daily tasks of business consultants, scrum masters, human resources professionals, digital marketers, customer experience managers, and growth hackers.

And this week, our team has created five new templates that specifically cater to the needs of event organizers, human resources professionals, public relations professionals, and UX designers. These templates are designed to simplify their day-to-day tasks and boost their efficiency.

Explore our diagram community to access a wide range of templates that cover countless business use cases across diverse industries. This week’s templates include:

New Hire 1:1 Template

The new hire 1:1 template is a tool human resources professionals can use to effectively onboard and engage with new employees. It allows them to have structured and productive one-on-one meetings with new hires, ensuring a smooth transition and building a positive working relationship. Here are five simple steps to use the new hire 1:1 template:

  1. Introduction and rapport: Begin by introducing yourself and making the new hire feel welcome. Get to know them and their interests to build a positive connection.
  2. Review onboarding progress: Discuss how the new hire is progressing in their orientation and onboarding. Address any questions or concerns they have and provide helpful information.
  3. Set expectations and goals: Clearly communicate the performance expectations and goals for the new hire. Use the template to define objectives and align their efforts with the company’s expectations.
  4. Seek feedback and address concerns: Encourage open communication and ask for their feedback. Record their input using the template and promptly address any issues or concerns they may have.
  5. Plan for support and development: Collaborate with the new hire to identify areas for growth and provide resources or training to improve their skills. Show a commitment to their ongoing development and provide support when needed.

Click on the image to edit the New Hire 1:1 Template

Good Partner Map

The good partner map template helps teams understand and improve the value they bring to cross-functional partners. With this template, team members can build trust and build stronger, more mutually beneficial relationships with both internal and external partners. Here are five simple steps to use this template:

  1. Define your team’s value: On the left side of the map, clearly state who your team is, what value you bring, how you deliver it, and why partners should collaborate with you.
  2. Understand partner perspectives: Look at the center of the map to see how partners react and what they say. Understand their feedback, suggestions, and needs to see things from their point of view.
  3. Identify gaps and opportunities: Compare your team’s value with partner reactions. Find any differences or areas where you can improve to better meet partner expectations.
  4. Explore innovative solutions: Use partner feedback to think of new ways to strengthen relationships. Consider joint projects, collaborative initiatives, or better communication methods.
  5. Take action and monitor progress: Create an action plan based on what you’ve learned. Implement changes and keep track of how they impact partner relationships. Make adjustments as needed.

Click on the image to edit the Good Partner Map

Accessibility Personas

UX designers can use the accessibility personas template to understand and address the specific needs of diverse users in the accessibility environment. It helps designers to create inclusive experiences that cater to a wide range of users.  Here’s how to use this template:

  1. Identify user groups: Identify different user groups with disabilities or limitations that may interact with your product.
  2. Create personas: Use the template to create fictional personas representing each user group. Give them names and provide background information, including their skills, difficulties, and objectives.
  3. Define user characteristics: Fill out the template with details about each persona’s age, occupation, and technology proficiency.
  4. Understand user needs: Dive into the personas’ difficulties and challenges, identifying barriers they may face while using your product.
  5. Design inclusively: Use the insights gained from the personas to inform your design decisions. Consider the personas’ objectives, preferences, and limitations to create accessible and inclusive experiences.

Click on the image to edit the Accessibility Persona

Bracket Template

The bracket template is a useful tool for event organizers to manage and organize sports tournaments or competitions. They can use it to easily create and track brackets, ensuring smooth and efficient tournament operations.  Here are five simple steps to effectively use the bracket template:

  1. Define the tournament structure: Decide on the tournament format and choose the appropriate bracket layout.
  2. Enter participant information: Fill out the template with the names or teams taking part in the tournament.
  3. Seed the brackets: Assign seed numbers or rankings to participants to create fair matchups.
  4. Update match results: Record the outcomes of each match in the brackets as the tournament progresses.
  5. Communicate and share the brackets: Share the brackets with participants and spectators to keep them informed about the tournament’s progress.

Click on the image to edit the Bracket Template

Press Release Template

The press release template by Creately is a handy tool for public relations professionals to plan and structure their press releases efficiently. With this template, you can collaborate with your team and seamlessly incorporate essential content. Here are five simple steps to use the press release template:

  1. Write a catchy headline: Start by creating an attention-grabbing headline for your press release.
  2. Add key details: Include important information like the date, location, and a brief summary of the news or announcement.
  3. Craft the body content: Organize your press release into sections such as introduction, key points, supporting details, and conclusion.
  4. Include quotes or testimonials: Add quotes from relevant individuals to add credibility and interest to your press release.
  5. Review and refine: Collaborate with your team to review and make any necessary adjustments to ensure a clear and concise press release.

Click on the image to edit the Press Release Template

Creately Template Roundup: June Week 3

Last week we shared some useful templates that would help UX designers, product managers, project managers, content creators, quality controllers, and trainers streamline their workflows..

And this week our team has created five new templates that are useful for business consultants, scrum masters, human resources professionals, digital marketers, customer experience managers, and growth hackers to simplify their day-to-day tasks. 

Check out our diagram community for templates for 100s of business use cases spanning many industries.

This week’s templates include:

What? So what? Now what? Template

The “What? So what? Now what?” template is a valuable tool forbusiness consultants and project managers. It helps in analyzing situations, understanding their implications, and developing actionable steps to address them. 

Here are five simple steps to use this template:

  1. Identify the “What”: Clearly define and describe the current situation or issue. Gather relevant information and facts about it.
  2. Explore the “So what”: Dive deeper into the implications of the identified situation. Consider the potential consequences, impacts, and risks associated with it to gain a comprehensive understanding of the situation’s significance.
  3. Determine the “Now what”: Once you have a clear understanding of the situation and its implications, it’s time to develop an action plan. Outline the specific steps that need to be taken to address the situation effectively.
  4. Prioritize actions: Evaluate the outlined actions and prioritize them based on their urgency, feasibility, and potential impact. This step ensures that you focus on the most critical and impactful actions first.
  5. Implement and monitor progress: Put the action plan into motion and regularly monitor the progress. Track the implementation of the identified actions and assess their effectiveness. Make any necessary adjustments as you move forward.

Click on the image to edit the What? So what? Now what? Template

Mad Sad Glad Template

The Mad Sad Glad template is a common tool used by Scrum Masters, Agile Coaches, and team leaders to facilitate retrospectives or feedback sessions. It enables teams to reflect on their frustrations, disappointments, and positive experiences in a structured way.

Here are five simple steps to use this template:

  1. Set the stage: Create a safe and inclusive environment for the team to share their thoughts and feelings openly. Explain the purpose of the Mad Sad Glad template and how it will help the team reflect on their experiences.
  2. Identify the Mad: Invite team members to express what made them mad or frustrated during a specific project. Get them to highlight any obstacles, challenges, or issues that impacted their work negatively.
  3. Explore the Sad: Encourage team members to share what made them sad or disappointed. Discuss any missed opportunities, failures, or setbacks that affected their morale or progress.
  4. Discover the Glad: Shift the focus to the positive experiences. Invite team members to express what made them glad or brought them joy during the project. This could include successful outcomes, achievements, or moments of collaboration and support.
  5. Generate insights and actions: Review the Mad, Sad, and Glad inputs collectively. Identify common themes, patterns, or trends that emerge. From these insights, collaborate with the team to determine actionable steps to address the challenges, build upon successes, and improve team dynamics.

Click on the image to edit the Mad Sad Glad Template

Culture Design Canvas

The Culture Design Canvas is a tool used by organizational development consultants and human resources professionals to analyze and shape organizational culture. It provides a framework for exploring key aspects of culture and aligning stakeholders toward a desired culture.

Here’s how to use this template:

  1. Define purpose and values: Begin by clearly defining the purpose and core values of the organization. Discuss the overarching mission and the guiding principles that drive the organization’s culture.
  2. Explore rituals and behaviors: Identify the rituals, routines, and behaviors that are prevalent within the organization. This step involves examining how people interact, communicate, and collaborate. Assess whether these rituals and behaviors align with the desired culture.
  3. Assess symbols and artifacts: Symbols and artifacts represent the visible elements of culture, such as the physical workspace, logos, and company traditions. Evaluate the existing symbols and artifacts and consider their impact on the overall culture.
  4. Identify enablers and blockers: Look at the factors that support or hinder the desired culture. This step involves analyzing structures, systems, policies, and leadership behaviors that influence the organization’s culture. Identify what supports the desired culture and what needs to be addressed or changed.
  5. Design action steps: Based on the insights gained from the previous steps, collaborate with stakeholders to design actionable steps to shape the desired culture. Develop initiatives, programs, and interventions that align with the purpose, values, rituals, and behaviors identified earlier.

Click on the image to edit the Culture Design Canvas

AARRR Framework

The AARRR framework, also known as the Pirate Metrics, is a tool used by growth hackers, digital marketers, and product managers. It provides a systematic approach to analyze and optimize a startup or product’s growth.

Here are five simple steps to use this framework:

  1. Acquisition: Focus on acquiring new customers or users for your product or service. Identify the channels and strategies that attract potential customers and bring them to your website, app, or store.
  2. Activation: Once you have acquired users, the next step is to ensure they have a positive first experience with your product. Activate them by guiding them through the initial onboarding process and helping them understand the value your product offers.
  3. Retention: Encourage users to keep coming back and engaging with your product or service. Implement retention strategies such as personalized communication, valuable content, and regular updates to enhance user loyalty and reduce churn.
  4. Revenue: Generate revenue by monetizing your product or service. Identify different revenue streams such as subscriptions, advertising, or e-commerce transactions. Implement strategies to optimize your pricing, upselling, and cross-selling opportunities.
  5. Referral: Leverage satisfied customers to generate word-of-mouth referrals and expand your user base. Implement referral programs, encourage social sharing, and provide incentives for customers to recommend your product to others.

Click on the image to edit the AARRR Framework

Customer Touchpoint Map

The Customer Touchpoint Map is used by customer experience managers and user experience designers. It helps visualize and understand the various interactions a customer has with a company across different channels and touchpoints.

Here’s how to use this template:

  1. Identify touchpoints: Begin by identifying all the touchpoints where your customers interact with your company. These touchpoints can include your website, social media platforms, customer support, physical stores, email, and more.
  2. Understand customer journey: Map out the customer journey from the initial point of contact to post-purchase interactions. Understand the different stages and emotions customers experience along the way.
  3. Assess customer interactions: Evaluate the quality and effectiveness of customer interactions at each touchpoint. Consider factors such as ease of use, response times, clarity of communication, and overall customer satisfaction.
  4. Identify pain points and opportunities: Identify pain points or areas where customers may face challenges or frustrations. Look for opportunities to improve the customer experience, such as streamlining processes, enhancing communication, or adding value-added services.
  5. Optimize touchpoints: Develop strategies to optimize each touchpoint based on your findings. Implement improvements to enhance customer satisfaction, align touchpoints with your brand promise, and provide a consistent and seamless experience.

Click on the image to edit the Customer Touchpoint Map

How to Build an Effective Talent Pipeline to Hire Right Candidates

In today’s fast-paced business environment, you don’t necessarily need to wait until an employee leaves to start hiring new team members. A solid talent pipeline can expedite the hiring process and help attract the best talent into the company.

This blog post aims to shed light on why you need a talent pipeline and how it can improve the quality of candidates. It will also guide you through the steps in building an effective talent pipeline.

What Is a Talent Pipeline?

Talent pipelines refer to a company’s requirement to have a continuous pool of qualified candidates who can be potentially hired to fill positions at various levels in the organization. Since different positions demand varied skills and competencies, the company must develop appropriate programs to develop the required skills sets.

Your talent pool should ideally consist of candidates whose competencies are desirable to the organization. Thus, having a talent pipeline propels the need for continual grooming and cultivating top talent from both inside and outside the company.

A healthy recruiting pipeline enables you to forge strong relationships with potential candidates.

Difference Between Talent Pipeline and Succession Planning

Talent pipeline and succession planning have a similar objective – that is to fill a vacant position. However, the difference of each process lies in their implementation.

A talent pipeline is primarily used to attract newer or in most cases junior talent into the business. Succession planning, however, is utilized to identify and groom new leaders who can become successors for senior leadership positions.

Benefits of a Talent Pipeline

Engaging Passive Candidates

Imagine a scenario where you meet a potential candidate for an existing or future vacancy in your company. Now this candidate may not be actively searching for a job. Having a talent pipeline allows you to maintain relationships with a prospective candidate who may be re-approachable later down the line. Moreover, the familiarity of the first interaction will prove to be advantageous and there is a higher likelihood that the candidate will respond.

Cost-Effective

Gone are the days when you had to spend on vacancy advertisements. Now you can have a pool of approachable candidates who are skilled and well-suited for the role. A talent pool can reduce the cost of advertising. More importantly, it can eliminate the initial screening of candidates because you already completed that when you entered candidates to the talent pool.

This also reduces the risk of a bad hire, potentially saving you time and money.

Hire Right Candidates

As mentioned earlier, a talent pipeline allows you to maintain a pool of candidates who are suited for current or future positions within the company. This not only reduces the time taken to recruit an employee but also prevents you from making hasty or ill-advised hiring decisions.

Since you have already engaged with the potential hires, you are already somewhat familiar with their skills and qualifications. A talent pipeline also enables you to plan in advance and be strategic about filling the existing skill gaps.

Improves Candidate Experience

The traditional process of posting job vacancies and waiting for applicants can be somewhat disengaging for the candidates. A talent pipeline provides an engaging experience for prospective employees and helps cultivate a positive perspective towards the organization.

The interaction that a recruiter carries out with an applicant along the talent pipeline allows the candidate to engage in his/her own terms. It enables him/her to have a more informative experience throughout the hiring process.

How to Build a Talent Pipeline for Your Business

We broke down the process of building a talent pipeline into the following steps.

Talent pipeline template
Talent Pipeline Template (Click on the image to edit it online)

Assess the Current Skill Requirements of Your Organization

The first step in building a recruitment pipeline is to assess whether there are existing skill gaps and talent needs in the organization.

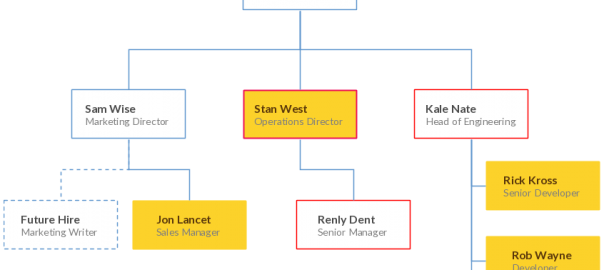
You can do this by visualizing an org chart and analyzing the critical roles in operations management. Once the roles are identified, conduct an assessment of the skills required by each position.

Map out organization charts for each department of the company on a single canvas to identify existing skill gaps. This knowledge can help plan an effective talent pipeline since it gives you a clear idea on the type of candidates to approach.

Creately is already armed with multiple customizable templates of org charts that help you analyze the most important roles in the company.

Org chart template for building a talent pipeline
Organization Chart With Responsibilities (Click on the image to edit it online)

Identify Talent Sources

If you have conducted a successful skill assessment, then move on to identifying potential internal and external talent sources.

  • Referrals from current employees is an internal talent source. Encourage your team members to refer potential candidates for future opportunities. You can even develop a strategy to reward employees whose referrals lead to hires.
  • Social platforms such as LinkedIn are great external sources to approach potential candidates. These platforms allow you to get an idea of the skills of potential candidates and go a step further to engage with them.
  • Networking events too provide opportunities to identify prospective candidates and build relationships and maintain a channel of communication with them. This practice enables you to approach them whenever there is an opportunity within the company.
  • Recruiting databases are another source to gain instant access to a large number of applicants so that you have a wider selection.

Reach out to Potential Candidates

Once you have identified the sources, you can start reaching out to prospective applicants. Firstly, assess the candidates that you came across on all the above platforms. Use the following questions to base your assessment.

  • Does the applicant have the necessary skills/qualifications and/or experience suited for a particular position in the company?
  • Will he/she fit in with the company culture?
  • What new skills will he/she be able to acquire if selected?
  • Will he/she have a career progression pathway within the organization?

Engage with prospective candidates and let them know about potential opportunities in the organization. Since most candidates in your talent pool will be passive candidates, maintain a fine balance of meaningful interactions without irritating them with too much information.

Focus on Training and Development

Building a talent pipeline goes beyond merely building and maintaining it. Once you hire candidates from within the pipeline, make sure to continuously nurture them through appropriate training.

Training and development motivate employees to perform better and contributes to employee retention as it enhances employee engagement and satisfaction.

Talent management process to build a talent pipeline
Talent Management Process (Click on the template to edit it online)

Create a Pipeline for a Smooth Flow

Creating a recruiting pipeline does require a fair amount of work upfront, but it can be one of the most important assets that your company may possess. It effectively reduces the time taken to hire new employees and allows you to plan ahead in terms of selecting the best candidates.

Best Hiring Practices of Top HR Managers
An organizational chart to manage your company's growth

It’s a wild world out there, with companies growing at exponential pace, hiring good talent that fits into your corporate culture may be the one defining factor that can either make or break your company’s success. Listed below are some best hiring practices you can put to use in your own organization.

Talent comes in all forms. Depending on your type of company, it is important to identify the key areas that need good talent and make every hire count. Given limited budgets and growth plans that require speedy, yet effective hires, it is important to fine-tune your own unique techniques and tactics that work.

Company cultures have become bold and distinctive statements of their unique identities and would attract potential candidates that actually want to work in a particular company purely because of their corporate culture.

By way of an Organizational chart you can plan your hires effectively and ensure you are teams are aptly supported when crunch time hits. We have a fantastic tool that can be used to draw your own unique Org chart or even modify one of our many org chart templates.

Org chart to fine tune hiring ( best hiring practices )

Org chart to identify future growth plans ( click on the image to use it as template )

Cut the Clutter: Review every single application

Recruitment costs can be high if your HR has to spend a lot of time ‘interviewing’ applicants. Instead, review every single application and have a basic matrix of criteria that either qualify or disqualify applications based on the role advertised.

This filters the irrelevant and gives you a bunch of candidates that have good credentials on paper. What it also does is, gives you a pulse of the current job seeker market. You might be able to shortlist for a future position that you hadn’t been looking to fill yet.

‘On the Floor’ interviews

After you have shortlisted and weeded out your list it is important to give the candidates a feel of the real work environment. ‘On the floor’ interviews, where you conduct parts of your hiring process on the actual work environment, as opposed to a boardroom or a meeting room, would give the candidates a feel of being part of the company, even before they join.

Generally, companies that have a flexible and fun culture, would become highly desirous and spread the word out to the other job seekers as a ‘cool workplace’.

This may be difficult in larger organizations, but if you can invest the time to do this, it will reduce your staff turnover on the long run, as the new hires would know what they are getting into and they may be less likely to accept the appointment if they feel irked by the culture and vibes of the workplace.

Diamonds in the rough

Some don’t know that they are diamonds, until they get picked and polished to shine flawlessly. Likewise, there are many ways to screen applicants but recognizing their talents that make them unique and eventually a good fit for your company may be harder than it sounds.

You can do this by asking 3 important questions, which leads to answers that clearly give you a reliable sense of the candidate’s impromptu attitude and real self.

  • Give an example where your behavior had a positive impact on your team? (followups: main goal, reaction from team, outcome)
  • Relate a time you effectively managed your team to achieve a goal? (followups: Target, how was it achieved individually and by team, key take aways)
  • How would you handle difficult colleagues at work? (followups: what steps were taken, how did it effect you and the team, outcome)

Be unique: Advertise jobs to stand out

Reflect your company’s unique culture in your job adverts. Include pictures of the team, while at office and also on outings. This would give a feel of the ‘real nature’ of your company as opposed to just some text on an advert. Quality over quantity. Be clear on the role you are hiring and be specific on what talent you are looking. If samples are required, in the case of a creative designer, ask them to include their portfolio in the application.

Referrals: A breath of fresh air.

This is one of the best ways to find relevant and good talent. Nevertheless, run your process, irrespective if the CEO or a peer recommended the candidate.

Hire with a personal touch

When running the process of hiring, make the experience as smooth and personable as possible for the candidates. Try to be flexible with the interview dates and times, as most good candidates would already be working and may not be able to take time off on the fly. Give them the flexibility to choose from a few options to come in and also explain the process in brief so that they would not be caught off guard when they have to sit for a 60-minute test.

Any Others Best Hiring Practices ?

Recruiting isn’t always easy, in-fact, it’s never easy. If it’s easy, you are not doing it right! Improve your hiring process by following the best hiring practices described above and discover fantastic recruits, that may have gone under the radar.

And if you have some awesome tip to improve the hiring process do let us know in the comments section.