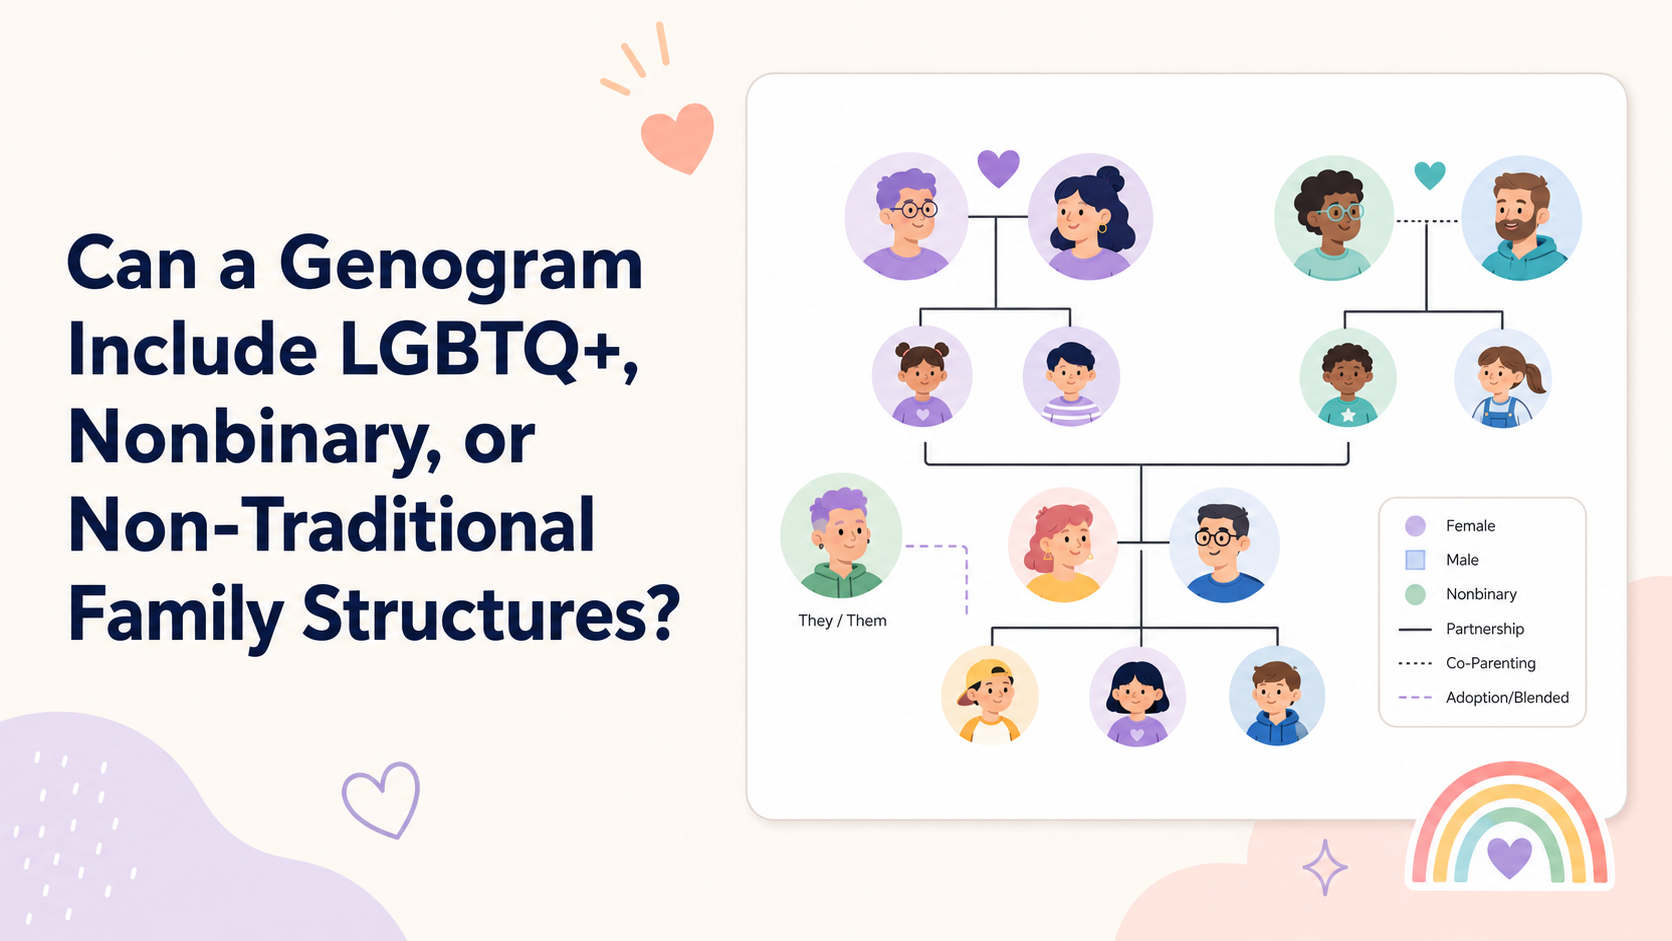
posted26/07/10

How to decide on using a 3rd party component

When you are building a software solution to solve a particular problem, you would be very focused on solving the problem and solving it well. However, from time to time you need supporting components in your solution that are not directly related to the problem you are solving. These are components that are required to complete your solution.

Maybe its a payment system for your online greeting card service, or a spell checker component for your realtime note editor, you would rather look for something that’s already built and working well rather than building it yourself from scratch. This way you can focus on your “core competency”.

This is generally how everyone thinks. So did we. Here at Creately, we chose to use a third party solution to complete a product that we were working on. In the rush and excitement of getting the product out we signed up with the 3rd party service not considering some important factors that we should have. Even though the intention was to avoid reinventing the wheel and save time and effort, the out come was us spending double the time and effort to get the solution to work. Lesson learnt the hard way.

So I thought I would put together a simple flowchart to help us evaluate such situations in the future when such a need arises again. This flow chart explains the basic thinking, and the factors involved in making the decision can be found below.


How to decide on choosing a 3rd party solution.

Picking the most suitable solution

  • How well is my requirement met? Does the solution meet all the feature and functionality requirements I have? Does the solution meet the integration requirements I have?
  • Is the component build for me? Even if the solution meets all my functionality and feature requirements, one thing I have to watch out for is, if it does more than what I need. Will it complicate my product? or my users experience? or my integration process?
  • Is the integration and setup process straight forward? Time and effort required to setup and integrate?
  • What is the financial commitment?
  • Considering all factors above, compare the time, effort and cost involved in building the ideal solution against using the selected solution.

Assessing if the solution can be used to solve the problem

  • Can I use the existing features in the solution to make it do what I want it to do?
  • Can the solution be customized to fit my requirements?
  • What is the time and effort involved in customizing the solution for my need?
  • What is the financial cost involved in customizing the solution for my need?
  • Considering all factors above in A and B, compare the time, effort and cost involved in building the ideal solution against using the selected solution.

@Hiraash

No Comments
read more
posted21/07/10

Is your online Sales Funnel leaking?

Leaking Sales Funnel

You’ve got traffic?

We normally use funnel diagrams to understand the flow of a user through our website, to the application, and then onto the purchase pages (or not). Some great tools are out there and just last week @Indu blogged about using Funnels & Goals in Google Analytics to better understand your funnel and conversion rates.

This week, we went and applied the same to our traffic funnel in three steps.

  • Identify how our potential customers find out about Creately. The ‘trigger’ to visit the site.
  • What their motivations are. Why are they here?
  • Identify the pages they land on, and craft a message that resonates with the visitor’s intent and motivations. This will achieve lower bounce rates and far better conversions in a funnel.

Ok, again: Being relevant is key. but how do we know what’s relevant unless we know what you want?

Map it out!

It’s easier to map this out in a diagram, and here’s ours - How People Discover Creately. Some of the bounce rates are guesstimates though.

We first identified the source for them to come to Creately, then we break them down by their motivations and where they would go on the site to what landing pages.

The next phase is to make sure the landing pages speak to them well and address their questions. That’s another post for another day ;-)

Before I go back to more diagramming and numbers, do you find this approach useful? How do you look at your traffic funnel?

@Chandika

Image By: vrogy / CC3.0

2 Comments
read more
posted17/07/10

Google Analytics for Small Businesses [Series 2]

Finally time for the next post in this series. I know its been two months since the first one, and sorry for taking this long! Better late than never, and here we go! If you’ve missed the first one on Visitors Map Overlay, stop right here, and go read it.

We’ve mentioned the importance of Map Overlay in the first post, and this time its all about Goals in Google Analytics! Lets see what Goals are, why they’re important and how we set them.

What are Goals in Google Analytics?

goals1Goals describe the completion of a desired task that you’d like your visitors to do!

By setting up Goals in Google Analytics, you can measure how often the desired tasks are completed, and this is called the conversion rate.

Before implementing Goals, identify what your website’s objectives are, and what visitor actions they correspond to. A goal can be anything from completing a contact form for generating leads to completing a purchase for driving revenue.

For example, in Creately, one of the Goals is a visitor signing up for our online diagramming service.

There are multiple ways to define goals, and here’s a great article written by Ian Spencer that gives more tips on Goals in Google Analytics.

And now, the Goal Funnel?

Accomplishing a Goal involves a sequence of steps. The sequence that leads up to the completion of a Goal make up the Goal Funnel. For each Goal, you will need to setup a Goal Funnel and like the Goal itself, each of these steps must correspond to a measurable action on a specific page.

funnel_goal2For example, Creately visitors go through a sequence of steps before finally performing the desired Sign Up action. Assume that you land on the Creately UML Landing page (the first step towards the Goal), where you might choose to Try Creately Now without signing up, and then from the Creately application you could opt to Sign Up ‘cos you’re convinced.

This would direct you to the Plans & Pricing page, where you’d be expected to choose a preferred plan, then click on Sign Up to make the purchase. Once you complete the purchase, you’d be sent to the Thank you page (this marks the Goal). Now, this means the desired task is performed and the Goal is accomplished.

However, on the other hand if the website visitor only goes up to the plans page, and opts to leave without signing up. Then the Goal is not met and it’s considered to be abandoned! Thus, Goals and Conversion rates are important to measure the performance of a website.

We refer to the whole sequential process as a funnel - many people start at the top and fewer end up coming out to the bottom by accomplishing the Goal.

Check out the flowchart below to see the steps that correspond to a measurable action on different pages -

funnel_flow2

How to Set up Goals

Setting a goal is very simple. If you have administrative access, you can sign in to your Google Analytics. Then go to Analytics Settings and select a profile, click on edit, choose an unused goal ’slot’, and click on edit again.

You’ll need to then follow the steps and decide what your goal is and how you’ll be declaring a goal, then click to finish and you’ll start measuring the performance for your website.

Check out this video for more details on Setting Up Goals in Google Analytics

2 Comments
read more
posted13/07/10

Better Diagram Manager and More

What a terrific month its been for us here at Creately! First, we launched the Creately for FogBugz plugin, and now we bring you a brand new release with a host of new capabilities and bug fixes.

This week’s release at a glance!

1) Better Diagram  Manager

Multi-Select and new Keyboard Shortcuts

We’ve made it possible for you to multi-select all the diagrams in your Creately Projects. You can now select multiple diagrams to either open or delete them, saving you loads of time while working in Creately. To make it easier, we’ve introduced a couple of useful keyboard shortcuts - To select all the diagrams in a project, simply click Ctrl + A or hit click F2 to rename a diagram/document from the Document Manager window.

Check out the new Sort and Filter options!

filter_options

Do you spend a whole lot of your time locating the diagrams in your Creately Projects? Click on the drop down menu on the Sort and Filter options to locate your diagrams in your Projects. With the improved filter options you can locate your diagrams in just minutes.

And don’t miss out on the new Detailed List view!

detailed_view1

The Document manager now also comes with a new Detailed List view along with the standard Tile view of your Creately diagrams. The Detailed view displays thumbnails along with all the relevant details of all your project diagrams.

page_size1

landscape

2) The Diagram Editor

Re-sizable canvas to suit all your diagramming needs!

Click on the Page Properties tab, and check out the new Landscape page sizes which are now available!

Larger canvas for bigger diagrams!

We’ve been getting many requests to increase the maximum canvas size beyond 2500px. In this release we’ve worked hard to improve this and now you can create diagrams of up to 8000px per side. Great for those complex flowcharts and class diagrams.

New Default Styles3) Pretty shapes and connectors!

All your abstract shapes come with a default fill! We’ve decided to lose the plain boring white fills in our abstract shapes, and now they’re all with pretty gradient fills. We’ve not stopped with there, we’ve also tuned the Flowchart object connection points for beautiful looking flowcharts; and created thinner outlines on all the User Interface objects to give it a more uniform look.

We’ve introduced a faster JPEG encoder to make exporting JPEG significantly faster, along with better error management and recovery on Network and Session issues all to keep our valuable users happy!

3 Comments
read more
posted28/06/10

Effective Sitemaps for your Web Projects

At Creately we are all about increasing project efficiencies with Visual aids. We help other companies be more effective using visual tools, and now we are kicking off a series to share some insights.

Over the next few weeks we will be looking at how we use Sitemaps, User Flows, Use Cases, User Stories, Wireframes and more in delivering an effective website / software product to a client. It’s a lot to cover, and do let us know if you have more ideas at blogs@creately.com

Sitemaps

When kicking off a project its always important to settle on a content structure for the site. While some argue the sitemap is a dated artifact now as content linking happens in many ways, we believe it is really useful when used right.

It’s a great tool to help visualize how the site is broken up, what the main pages are going to be, and where in the content hierarchy they belong. We definitely think its an important tool to use in a project to bring more clarity and consensus.

sitemap-creately

When to use

1. Creating a new site:

Use it to identify broad content areas, sub sections and a conceptual structure for the site.

2. Updating an existing site / redesign -

Go through the site and generate a map. We recommend against typical ’sitemap generators’ as they pick out all links to create the structure. Not all links are made equal!

By documenting what’s in the site now, you can start curating the content

Guiding principles

1. The site map is a organization and a planning tool. It is usually not the final outcome of the site. Use it not only to identify main areas of the site, but also page types, templates that go with them, secure/ non-secure pages etc.

2. Quickly agree on the first version of the site map and keep revisiting through out the project. Use it as a top-level view to identify what has been completed on the project, what high level decisions were made etc.

Best Practices for Sitemaps

creately-draw-share-validate-and-export-diagram-1
1. Brainstorm first. The best way to do a sitemap is actually NOT to start with a sitemap. Try working on a mindmap with your client and the team. It will be a natural structure for you to capture all the ideas, then start grouping them together.

2. Identify the main content areas and their page breakdowns.

Content headlines, subsection headings should be recorded by this time. A good idea would be to record them right in the document itself.

The earlier you get this done, the clearer your clients and teams understanding of the project.

3. Mark out pages that include special functionality.

Got some pages that need to be loaded securely? some with forms? some featuring video content? mark them out in the sitemap itself.

4. Identify design variations.

Some pages in the site / app may have different theme’s or design elements. Color them differently to identify groups of these pages easily.

5. Keep it ‘Alive’

Review and revisit the site map as your understanding of the project changes. New pages, changed structure, new names; doing the simple updates to keep the document up-to date will ensure that you’ll have less confusion in your team and happier clients.

6. A High level view

Use the site map as a high level view to the project. You can link the user flows, wireframes and other documents you create on to the pages to keep track of progress and to provide a unified view to your client and team.

So how do you use Sitemaps in your projects?

@Chandika

No Comments
read more
older posts