Before writing a single line of code, every system begins as a visual model. That’s where UML class diagrams come in, helping you map relationships, behaviors, and attributes clearly.
In this easy class diagram tutorial, we’ve covered the key areas you need to know to draw class diagrams without a struggle. Scroll down to find out
- Class Diagram Definition
- Class Diagram Notations with Examples
- How to Draw a Class Diagram
- Class Diagram Best Practices
- Class Diagram Examples
Class Diagram Definition | What Is a Class Diagram?
A class diagram is a type of UML diagram that visually represents the structure of a system. It shows the different classes (objects) within the system, their attributes, operations (methods), and the static relationships that connect them.
In simpler terms, class diagrams provide a blueprint of how data and behavior are organized in an object-oriented system. They’re widely used to explore domain concepts, analyze software requirements, and design detailed system architectures before coding begins.
By learning how to draw a class diagram, you gain a clear view of how each part of a system interacts, making it easier to plan, document, and communicate your design effectively.
Class Diagram Notations with Examples
There are several class diagram notations that are used when drawing UML class diagrams. We’ve listed below the most common class diagram notations.
Class
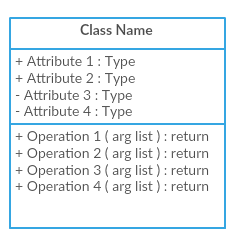 A class is the core building block of a UML class diagram. It represents the main objects in a system and is illustrated as a rectangle divided into up to three compartments:
- Class Name – identifies the object or concept.
- Attributes – list the characteristics or data the class holds.
- Operations (Methods) – define the behaviors or functions the class can perform.

The last two compartments are optional. When only the class name is shown, it’s called a simple class notation, often used for high-level diagrams where details aren’t necessary.
Interface
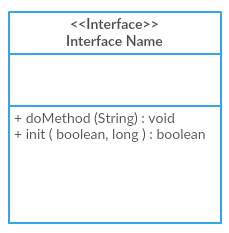 The interface symbol in class diagrams indicates a set of operations that a class must implement. It represents a contract or a set of responsibilities that any implementing class agrees to fulfill. In UML, interfaces are usually depicted as a circle or a rectangle with the <<Interface>> label, helping clearly distinguish them from regular classes.
Package
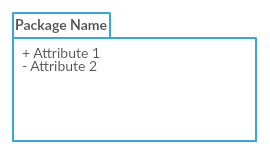
The package in a class diagram is used to group classes or interfaces that are either similar in nature or related. This helps organize complex systems by categorizing elements that share similar functionality or responsibilities. Using packages not only improves the readability of your UML diagrams but also makes it easier to manage and navigate large designs when learning how to draw a class diagram.
Class Diagram Relationships
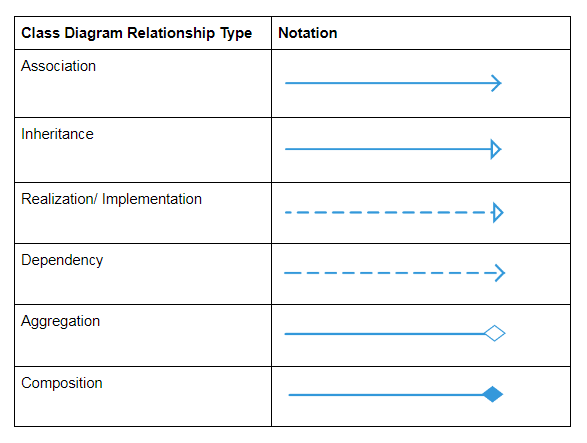
In a UML class diagram, relationships define how classes interact and depend on each other. Understanding these connections is essential when drawing a class diagram in UML, as they reveal the structure and behavior of your system.
To learn about the class diagram connector types and the different relationships between classes in detail, refer to our guide on class diagram relationships.
How to Draw a Class Diagram
Class diagrams are a fundamental part of object-oriented design. So knowing its basics helps you visualize the static structure of a system, understand relationships between objects, and plan your software architecture effectively.
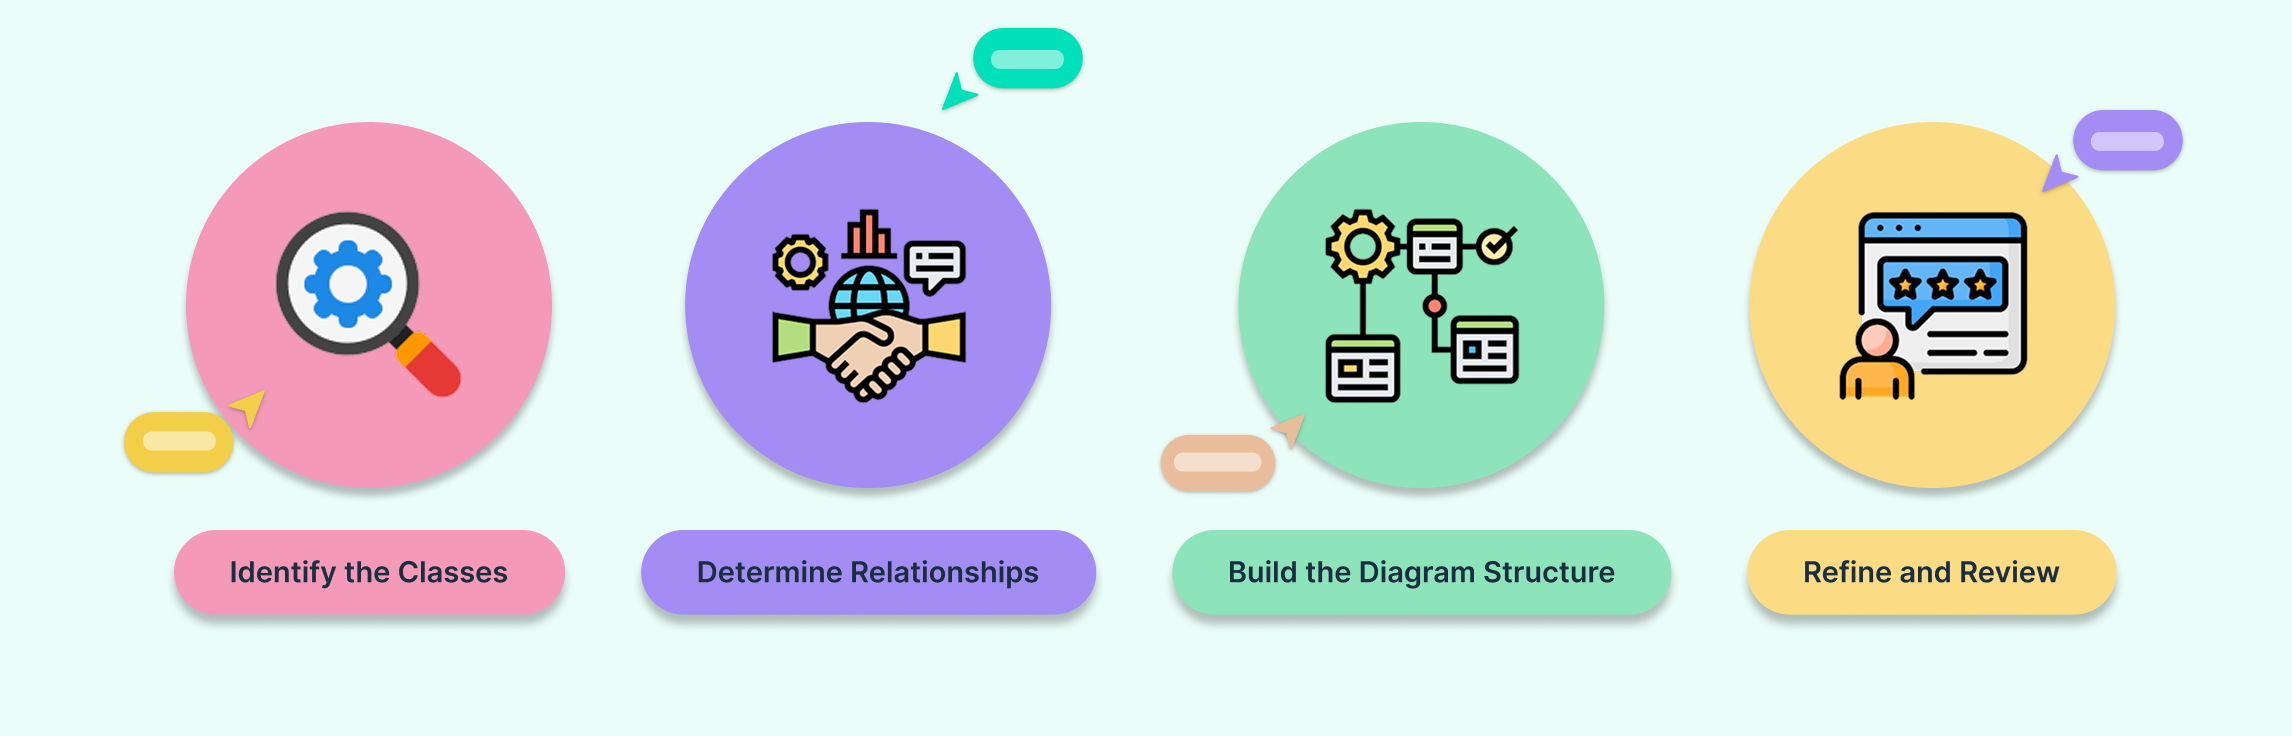
When required to describe the static view of a system or its functionalities, you’d be required to draw a class diagram. Here are the steps you need to follow to create a class diagram.
Step 1: Identify the Classes
Start by listing the primary objects (classes) in your system. Think about the main entities your application or system manages and note down their names.
Step 2: Determine Relationships
Next, identify how these classes interact with each other. Look for commonalities, dependencies, and hierarchies. This will guide you in grouping related classes and defining connections such as associations, inheritance, or composition.
Step 3: Create the Structure
Begin drawing your class diagram by placing the classes on the canvas. Connect them using the appropriate relationship lines. You can add attributes and operations (methods) to each class after the basic structure is in place.
Step 4: Refine and Review
Once the basic diagram is complete, review it for clarity. Make sure:
-
- Lines do not cross unnecessarily.
- Related classes are visually grouped.
- Optional details like attributes and methods are clearly labeled.
Following these steps ensures your class diagram is not only accurate but also easy to read, an essential practice for both software design documentation and collaboration with your team.
Class Diagram Best Practices
- Class diagrams may tend to get incoherent as they expand and grow. It’s best to avoid creating large diagrams and breaking them down into smaller ones that you can link to each other later. You can very easily do this with Creately. It helps you improve the readability of your diagrams.
- Using the simple class notation, you can quickly create a high-level overview of your system. A detailed diagram can be created separately as required, and even linked to the first one for easy reference.
- The more lines overlap on your class diagrams, the more cluttered they become. The reader will only get confused trying to find the path. Make sure that no two lines cross each other.
- Use colors to group common modules. Different colors on different classes help the reader differentiate between the various groups.
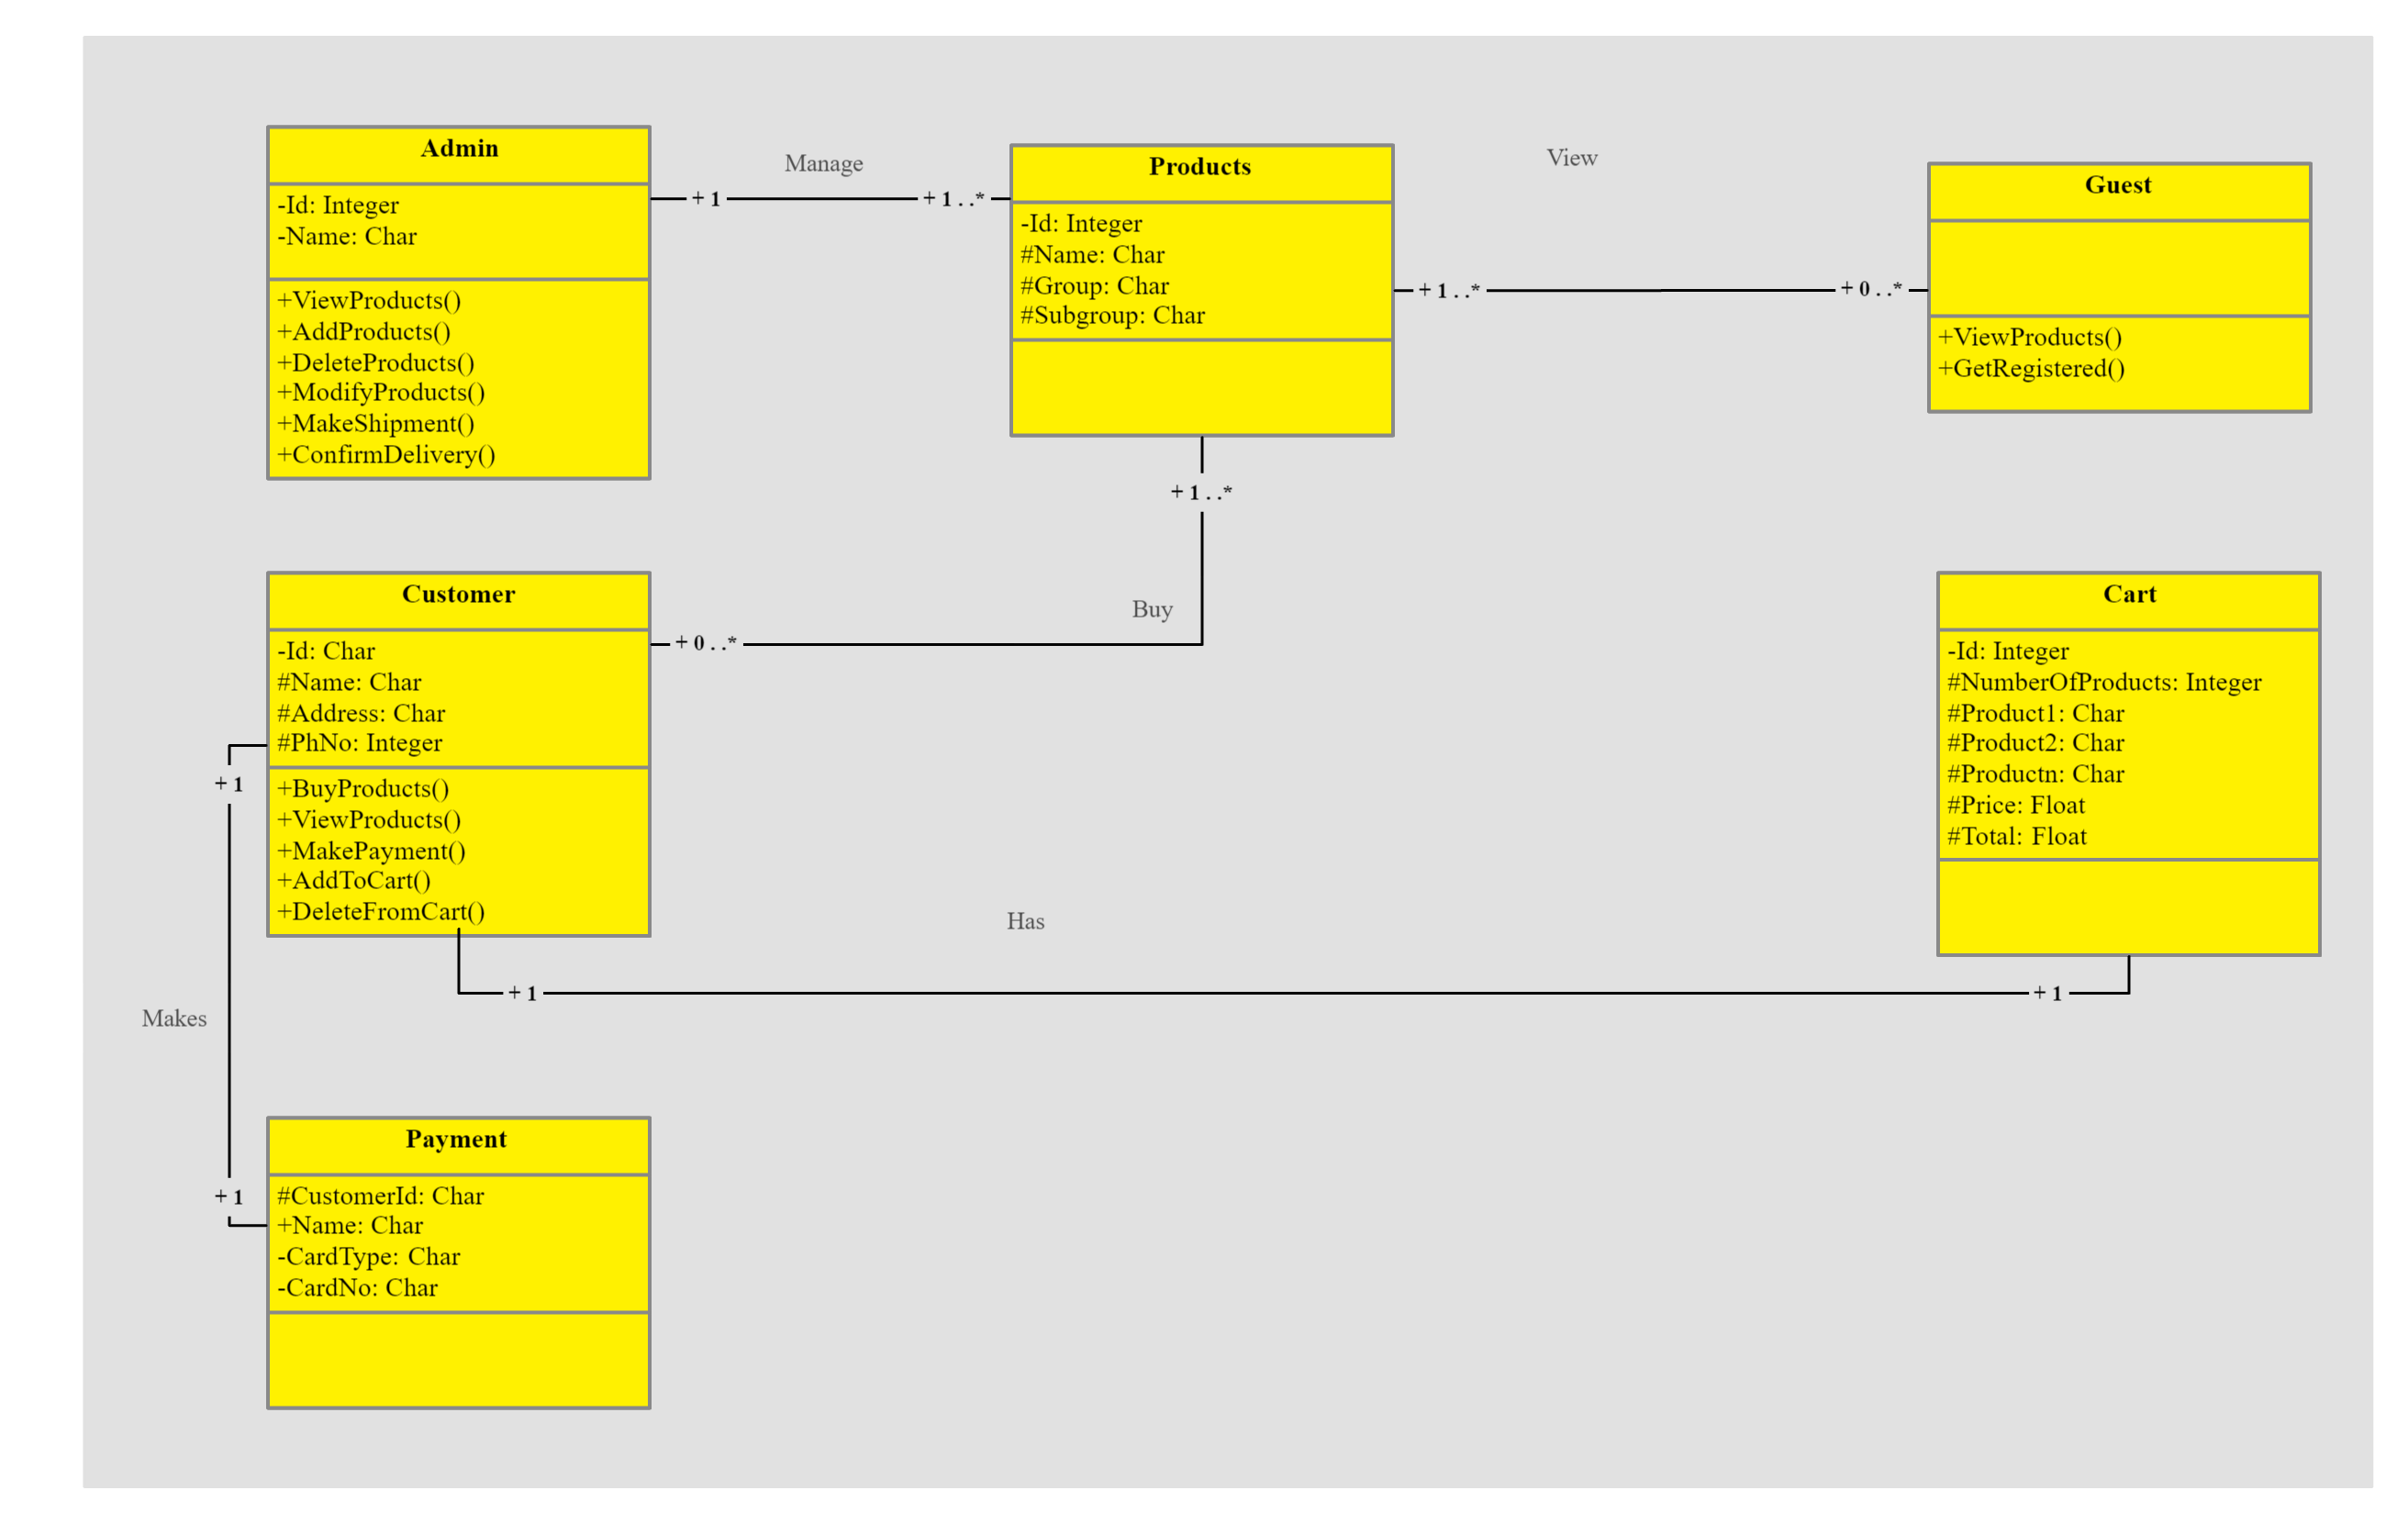
Class Diagram Examples / Templates
Class Diagram Example for Online Shopping System
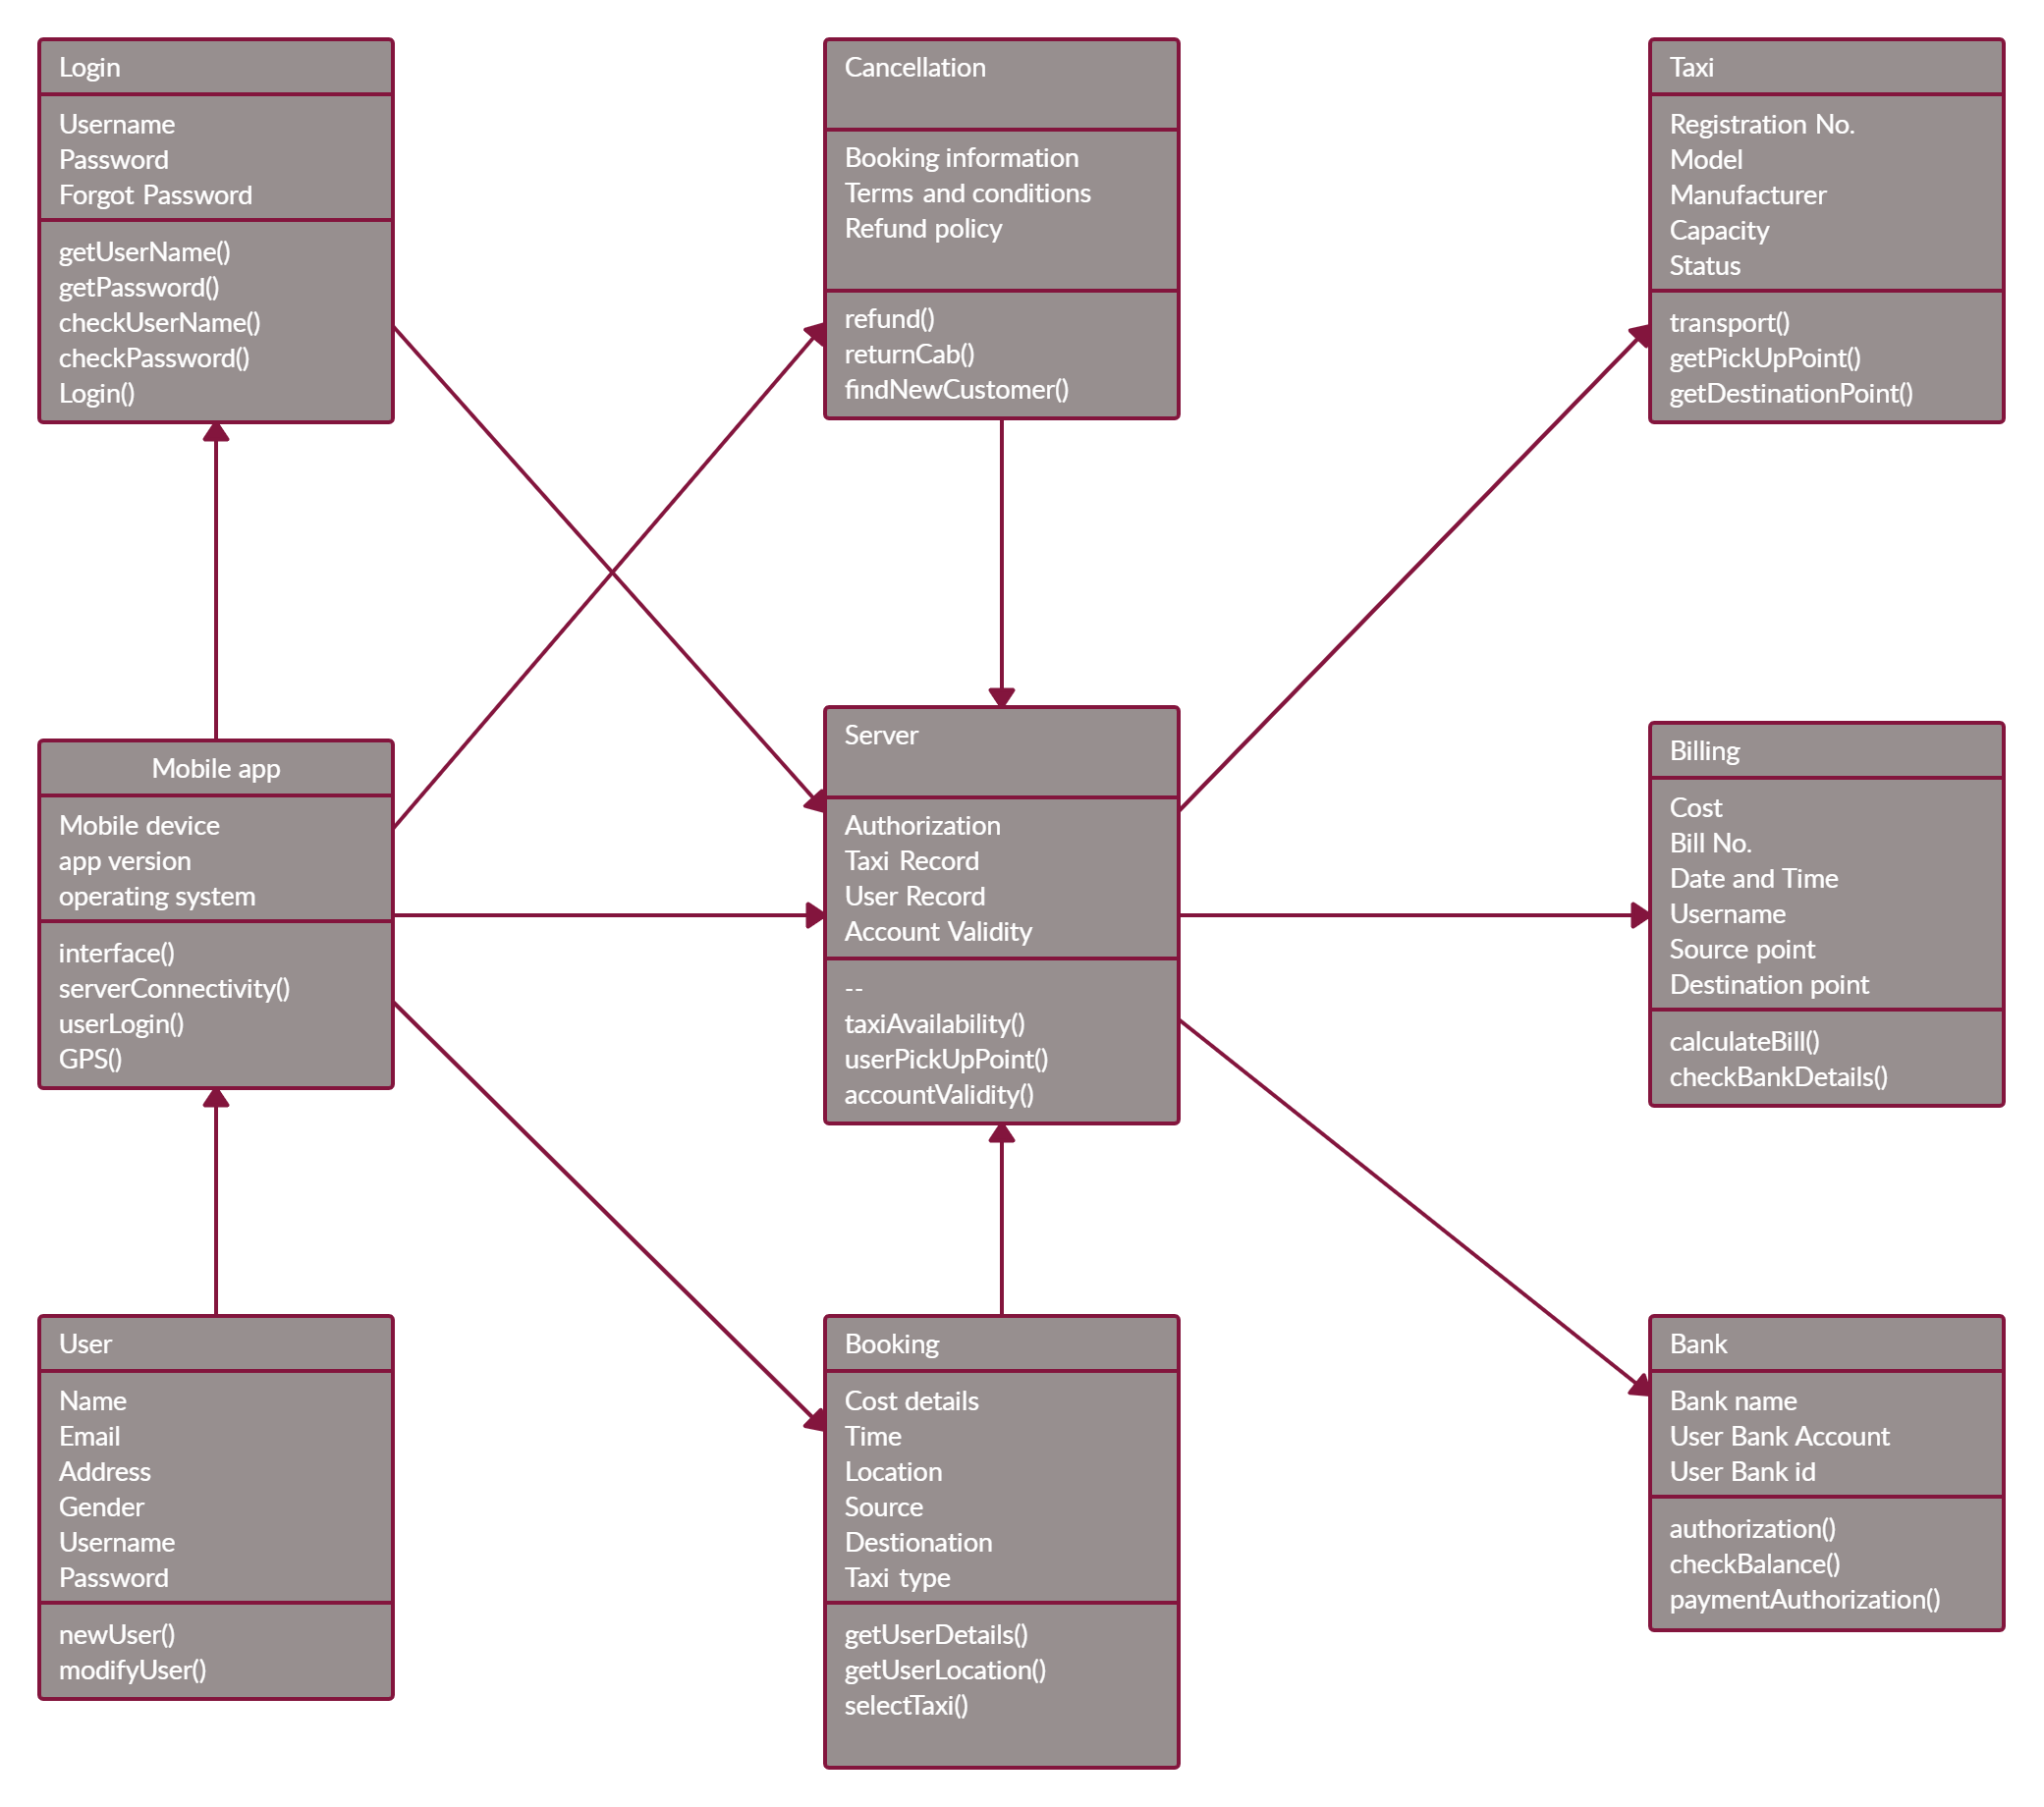
Class Diagram Example for Taxi Service
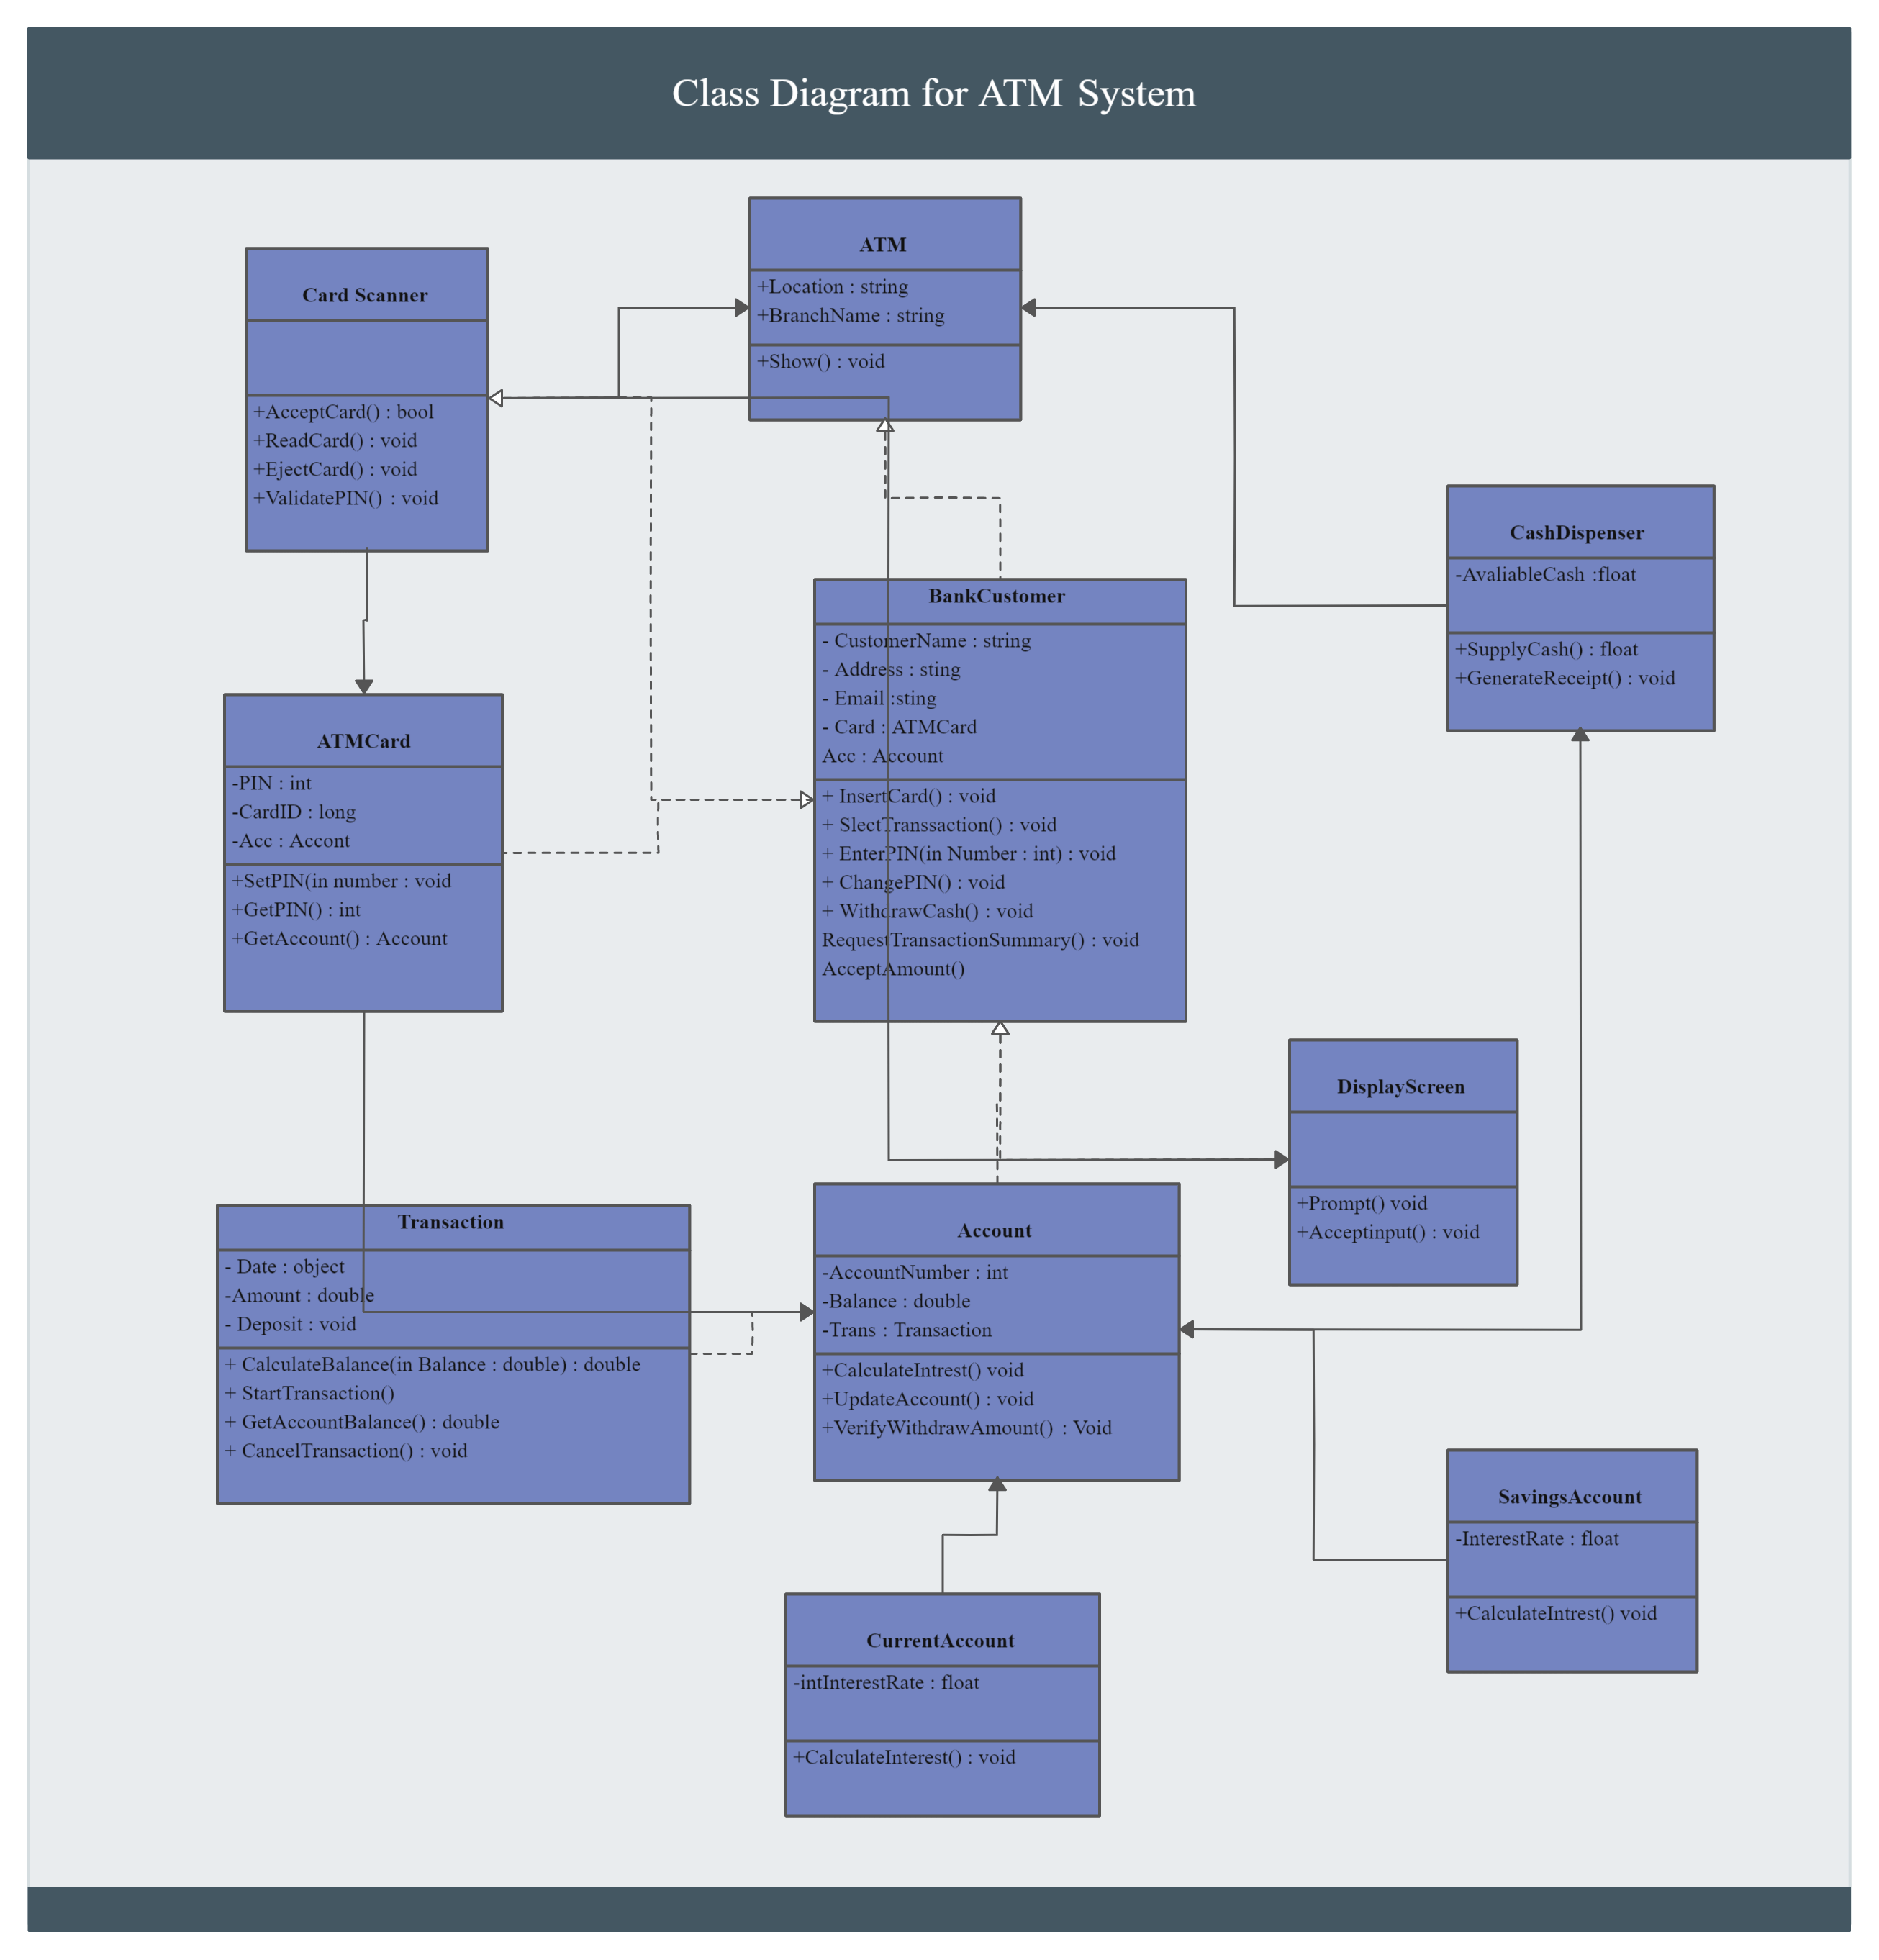
Class Diagram Example for Bank ATM System
Share Your Thoughts on the Class Diagram Tutorial
In this class diagram tutorial, we’ve covered what a class diagram is, class diagram notations, how to draw a class diagram and best practices you can follow when creating class diagrams. In addition, we’ve added a few class diagram examples that you can instantly edit online.
Interested in learning about other UML diagram types?
FAQs About How to Draw a Class Diagram
1. What is the best way to draw a class diagram?
The best way to draw a class diagram is to start by identifying the main classes in your system, define their attributes and operations, and then connect them using relationships like associations or inheritance. Using an online UML tool such as Creately makes it easier to visualize, edit, and share your diagram collaboratively.
2. What are the basic elements in a UML class diagram?
A UML class diagram includes classes, attributes, operations, and various relationship types such as inheritance, dependency, aggregation, and composition. Each element helps you represent the structure and static behavior of an object-oriented system.
3. What tool should I use to create a class diagram?
The best tool you can use is Creately to create class diagrams online. Creately offers pre-built class diagram templates, drag-and-drop UML symbols, and real-time collaboration features, ideal for beginners learning how to make a class diagram.
4. Why are class diagrams important in software design?
Class diagrams are essential because they show the static structure of a system, helping developers and analysts understand how data and behaviors are organized. They are a key step in object-oriented modeling and provide a foundation for coding and documentation.